USER GUIDE En Francais Nihongo
The Ekich Ultimate Bobbin description & operation
Description
This bobbin is composed of two major subassemblies: the housing assembly and the dual wire frame assembly.
The Housing assembly is composed of a black anodized aluminum housing, which contains the constant force spring and the clutch mechanism, in addition to the brass rotary table which has a small drive pin positioned off center. Extending from the center of the housing is a brass center post which holds the bearing with the rubber ring.
Operation
The Ekich Bobbin is designed around the constant force spring concept. This force (33 g or 1.1
oz) will balance the combined weight of the bobbin & a standard spool of thread, & holds the bobbin stationary at a place chosen by tyer. The constant force spring will dispense a desired length of thread and stay stationary at a chosen spot, or, when moved toward the tying point, recover the dispensed thread under constant tension. This constant tension is sufficient for most wrapping and will not create slack in the thread. Thread tension can be increased by hand palming the free end of the thread spool.
When a spool of thread is placed on the rotary table, it is held in place by contact between the rubber ring and the inner arbor surface of the spool. The
drive pin engages against one of the spokes that forms the empty chamber of the spool. Pulling the thread rotates the spool in a clockwise direction storing energy in the spring/clutch mechanism. The spring dispenses 60 cm (24") of thread. At this point, it is fully wound and there is a noticeable increase in thread tension. The spring needs to be reset by lifting the spool just enough to disengage the drive pin. This reset is also required prior to thread cutting. The amount of thread left outside the tube during the resetting process will remain there without being rewound.
The reset operation can also be performed single handedly.
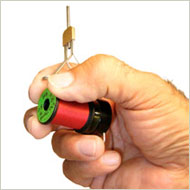
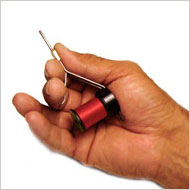
 To do so, grasp the free end of spool with the thumb, index and middle fingers, press against the bottom frame loop extension with the ring finger and pull/lift the spool slightly away from the rotary table. Press the spool back onto the rotary table and you're all set to continue tying.
Getting started
01. Ensure that the rubber ring is well lubricated. (It was greased with "O" Ring Lube prior to shipping, but any light grease will do.)
02. Remove about 10 cm (4") of thread from the holding slit of the spool. This will leave a sufficient amount of thread outside the tube for threading.
03. Position the thread spool on the center post of the bobbin such that the thread comes from the left - clockwise direction.
Slide the spool slowly down the center post to the surface of rotary table to engage the drive pin into an empty chamber on the thread spool as shown in the photo below.

04. Using the threader (supplied), pass the thread through the guide tube starting from the underside of the brass grip.
05. The Ekich Bobbin is designed to ergonomically fit both left and right handed tyers. Utilizing the grip shown in the photo to the right enables the use of the ring finger and pinky to palm the free end of spool for tension control, and use of the thumb and index finger for other tying work if so desired.

Tips
To ensure proper operation, the thread spool should only be in contact with the rotating components: the rotary table and the bearing with the rubber ring. Contact with the housing & post (stationary components) will slow down or stop rewinding.
01. Some old Danville spools have a large slit used to store the tag end of the thread. This slit may come in contact with the bobbin's housing rim and should be trimmed away.
02. Some old UNI spools may have plastic "flash" (a step)
on the inner surface of the center hole, which may force the rubber ring into contact with the bobbin post. Lift the spool slightly off the rotary table and then press it back down slowly to allow the ring to reposition itself. Lubricatiing the rubber ring should minimize this problem.
03. Use the bobbin's tension to cinch down half hitches or unwrap your windings without creating slack.
04. The threader provided is a dental floss threader. Melt the tip with a flame into a small round ball to facilitate passage
through the tube.
05. Get to know the bobbin’s tension and its holding force. To do that, attach the thread to a long shank hook. If using a rotary vise and the shank is in the axis of rotation, let the bobbin hang close to or touching the shank and rotate few turns. (If using standard, fixed position vise, make few wraps without touching the thread spool). Stop and insert a slippery material such as a single buck tail hair, under the last wrap on top of the shank and continue for 6-10 more turns (wraps), as before. With the bobbin hanging, pull
the tip of the hair slowly to get the feeling of its holding power. This should be tried with different threads, both waxed and non waxed as they have different grip. You may find that this force is sufficient for most of the wrapping especially with the fine threads. It is easy to switch to manual tension control when making soft loop or when higher tension is required. Automatic tension is fast and you can be confident that if used without interfering, will not create a slack no mater how erratic movements you make with the bobbin!
